The coronavirus pandemic has upended business as usual in many industries, including design, but these notable Indy-area pros, all affiliated with Carmel’s must-visit Indiana Design Center, have been keeping busy in their own homes in lots of interesting ways. Read on to find out what these design mavens have been up to—you’re sure to pick up some useful tips and tricks along the way.


 TIFFANY SKILLING, OWNER OF TIFFANY SKILLING INTERIORS
Tiffanyskillinginteriors.com, @tiffanyskillinginteriors
“Since many of us have some extra time on our hands, one quick and easy thing I have been doing to breathe fresh life into my space—and cheer myself up in the process—is to create a ‘gallery wall’ by grouping several of my favorite framed pieces of artwork together on a wall. If you don’t have artwork, you can choose to cluster an array of family photos, your child’s doodles, some cherished letters, or even a few inspirational quotes that speak to you. It’s a simple, impactful way to make your home look beautiful and feel personal and warm at the same time.”
Step 1: Get out all the supplies—painter’s tape, nails, craft paper, poster putty, hammer, pencil, tape  measure, level, and scissors.
Step 2: Make templates with craft paper of all of your art and cut them out with scissors.
Step 3: Locate where the nail holes will be on all of the pieces and mark with a pencil on each template.
Step 4: Tape templates on the wall based on the gallery design you would like to create.
 Step 5: Nail over marked location on templates; remove template and hang each piece.
Step 6: Level and add poster putty to the base of each piece so it doesn’t move.
Step 7: Step back and admire your handiwork!
 ERIKA REIMER, SHOWROOM MANAGER OF DRAPERY STREET
Draperystreet.com, @draperystreet
“I’ve been dying to add some personality to my daughter’s room since we moved in last summer; it just needed an extra pop, I mean she’s the only one! (So spoiled.) It was time for a big girl bed, and I also wanted to add some interest to the walls, so I decided to try some peel-and-stick wallpaper. Thank you Target and curbside pickup for coming to the rescue for this momma!
To figure out the amount of wallpaper you’ll need, measure your room’s height and width to determine the total square footage, then check to see how the wallpaper is sold to see how many rolls to buy. Then once you get it, you just start peeling and sticking—the hardest thing is getting it lined up perfectly in the corners and not making the seams noticeable.
I will admit that applying peel-and-stick wallpaper is not for the faint of heart: It requires WAY more  patience than I am willing to give it, so my advice is to grab a glass of wine, turn on your favorite tunes, and let the kids watch a movie or ask your husband to keep them occupied while you ‘get crafty.’”
 SUSAN YOUNG, OWNER OF COLOR JOY INTERIORS, LLC
Colorjoyinteriors.com, @colorjoyinteriors
“Spray paint is a great thing that can be used to make over just about anything that needs a refresh. You can spray paint furniture, the knobs on your furniture or cabinets, outdoor furniture or even a flowerpot. It dries in minutes and helps keep things out of the landfills. Many people are too quick to get rid of something when really all it needs is a fresh coat of paint or stain. One of my favorite pieces that I have spray-painted is my office file cabinet. I was looking for a fun filing cabinet when I was redoing my office, but everything was boring white, and also very expensive. So, for $20 I bought a filing cabinet from a colleague. The cabinet was in good shape but in a beige color, so I found some bold spray paint in raspberry to match my room’s color scheme, and transformed it.”
Step 1: To update a file cabinet yourself, start by placing the cabinet outside or in a very well ventilated area on layers of newspaper or a drop cloth. Remove the drawers so you can paint them separately from the cabinet. Tape off any areas you don’t want to be painted (like handles or hardware) with painter’s tape.
Step 2: Using a hand sander or sandpaper, lightly go over all of the metal to sand it—this makes the paint adhere better. Pro tip: In my experience, choosing a spray paint that is made for metal surfaces works best, but most spray paints will do the job.
Step 3: Using smooth, even strokes, from about six inches away, spray the paint on the cabinet and drawers, beginning at the top and working your way down. You may need to do two coats depending on the color you use. Allow the paint to dry between each coat, following the directions on the back of the spray paint. Also, let the paint dry before turning the cabinet and drawers over and painting the bottoms.
Step 4: Give the paint a few more hours to fully dry, preferably overnight, and then remove any tape. As long as it’s not sticky to the touch, you can place your new, painted piece in your room.
Step 5: If you want to get really creative, you can use stencils to transform the front of your filing cabinet. Or you could paint the drawers a different color from the sides. Don’t forget about the handles! Change that silver or gold handle into a matte black or something more dramatic if you want—if you don’t like it, you can always repaint it.
Step 6: Enjoy your new piece!
 JUDY BATES, ALLIED ASID OWNER/INTERIOR DESIGNER OF JB DESIGNS, LLC
Judybatesdesigns.com, @judy.bates.designs
“I have been looking at some small projects around my house. One idea that was extremely easy and cost next to nothing was redecorating a bookshelf of mine. You can do this easily by just taking a walk around your home. Use your favorite vase, some artwork you’ve decided not to hang up, and a candle or plant that you love. By simply rearranging with things you’ve found around your home, you have created a fresh new area that didn’t cost you a dime!”
Step 1: Divide the bookcase to simplify the process. Then start with a backdrop  such as a small piece of artwork, or it could be a grouping of family picture frames in different heights. Keep in mind the scale and size.
Step 2: Layer pieces on different shelves around the artwork in similar colors. At this point symmetry comes into play: Do you like things symmetrical, or does the fact that your bookcase is a bit asymmetrical make you happy?
Step 3: Look for items that have different shapes, textures and finishes. You could even add fresh flowers. The finished product is ideally a cohesive grouping that can be rearranged to create a whole different look.
 JULIE O’BRIEN, PRINCIPAL DESIGNER AND OWNER OF JULIE O’BRIEN DESIGN GROUP AND PRIX FIXE DESIGN
Julieobriendesign.com, @julie_obrien_design_group
“Lately I have found that I could use a little extra cheer in my home, so I’ve been buying flowers at the grocery store to try and lift the mood. I have purchased both cut and potted flowers, but I really love buying potted orchids, because they’re easy to care for and can bloom year after year without a lot of tending.
I try to give my orchids a lot of natural light, and I move them around  to a different window in the house every couple of weeks. They don’t need much water—about the equivalent of a couple of ice cubes a week, if that—so if you forget to water them, you don’t have to worry about feeling like a bad plant parent.
I like to dress mine up by putting them in a variety of vases and pots, and I set them on colorful plates and saucers for a little visual interest. Then I just add a bit of decorative moss on the top, and they’re ready to brighten my space—and my day.”
 STACY MOLANDER, OWNER OF RUSTED WINDOW
Rustedwindow.com, @rustedwindow
“Quarantine gave me and my family the time to finish some projects we had stacked up. We chose this vanity project as part of our master bath remodel because, even though we live in a cookie-cutter neighborhood, the inside of our home needed to reflect our family’s style.”
Step 1: Select the sinks you want to use, as this will determine the depth of the dresser you need. We selected the Anna Farmhouse Sink by Jacuzzi because it sat on the dresser and allowed us to be able to use all the drawers.
Step 2: Find the dresser and get it ready. I chose a beautiful, slightly damaged dresser from the Restoration Hardware Outlet. Why this dresser worked: It had three drawers on each side, was solid wood and the drawer construction fit this project—not having the metal track glides made the drawer conversion so much easier.
Step 3: Hire a plumber to do their thing.
Step 4: Remove the top of the dresser and cut holes for the sink (ours were marked by our plumber), paint or stain the top, and seal it with a matte exterior stain for maximum waterproofing.
Step 5: Since the plumbing is now set in place, measure the depth and the width of the pipes and see what adjustments you need to make to your drawers. We cut the back ends off four drawers and notched out their centers for the pipes, then rebuilt the backs by nailing five pieces of 1-by-3-inch board (cut to size) together to make new backs. We also ran narrow support boards in the back of each drawer.
Step 6: Lastly, caulk and paint all drawers and add new hardware.
 MARY KAY KIEFER, RID, OWNER AND PRINCIPAL DESIGNER OF KIEFER DESIGN GROUP INC.
Kieferdesigngroup.com
Mary Kay Kiefer is a St. Margaret’s Hospital Guild gold medal winner for 29 years of excellent professional participation in the Decorator’s Show House. “Tired of curbside dining and paper plates and want to celebrate a little bit of spring in this difficult time? Try dressing your table up for a fun, shelter-in-place dinner—I used a few items I found around my home and in my design studio. Hopefully we will eventually be able to safely get back to our old way of life, but for now, this whimsical table display is all about keeping a sense of humor and laughing.
The tablecloth is just some leftover green Sunbrella fabric rolled across the table—and I left it attached to  the roll at one end. Then I added a sheer fabric overlay with butterflies on it to create the feeling of flying away.
The salad plates reinforce the ‘flying away’ theme with their butterfly design in the center. I got the pink dinner plates from Target for $5 each, and the butterflies at the base of each candlestick originally came from Dollar Tree—so don’t be afraid to blend cheap, fun finds with beautiful collectibles, it works!
For an added dose of humor, the centerpiece is a couple of faux flowers nestled into a roll of toilet paper; I figure we should try and have fun if we can!”
 KATIE KELLY, OWNER OF THE TRADE RESOURCE (A TRADE-ONLY SHOWROOM FOR INTERIOR DESIGNERS)
Thetraderesource.com, @thetraderesource
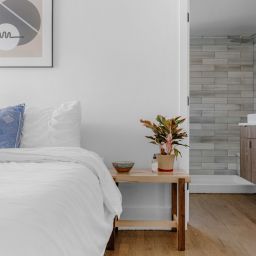
“After the ‘stay-at-home order’ went into effect, my real office, my showroom at the Indiana Design Center, temporarily closed. And even though designers aren’t physically shopping for fabrics and wallpapers, they are still working on projects for clients—and that means I’m working, too. So, I created a temporary home office to work from, which happens to be in my master bedroom. With my husband and four daughters space is limited, so I had to figure how to carve out an area somewhere to get work done.
While I don’t have a home office normally, I was able to use things I already had to make one. I myself am  not an interior designer, but my customers are, so I’ve learned a lot from them! One important tip designers suggest is to incorporate things people already own, such as artwork or furniture, so that’s exactly what I did.
The rattan console I’ve had forever, and normally it holds bed linens and other odds and ends. Now, it’s my desk and holds office supplies. I borrowed one of my dining chairs and snagged a table lamp from my living room. I didn’t spend a penny. I would definitely prefer to be back in the showroom, but my temporary home office works for now!”
 KIMBERLY SORRELL, CO-OWNER OF SURROUNDINGS BY NATUREWORKS+
Choosesurroundings.com, @go2surroundings
“During a situation like this, I feel it’s the perfect time to tackle those little projects that never make it to the top of the list. For me, that meant repainting my bedroom furniture. Since my husband and I are currently homebound, we called our local Sherwin-Williams store and they brought our paint right out to the curb.
Being in the business, I have several Pinterest boards going at any one time, so I had my colors already picked out, and one of them happened to be Sherwin-Williams’ 2020 Color of the Year, which is called Naval. There are so many cool blues out there right now that add a serene, natural feel to your home—we just dove in and we love it.
We repainted our headboard, two dressers, and a Bombay chest—and with the great quality of paints that are out there now, we didn’t even have to sand before we painted. In my experience, if you are painting a piece of wood furniture, unless you have an item that has a really glossy finish, you are probably fine by cleaning very well with something like Guardsman Wood Cleaner (not with a furniture polish like Pledge that will leave a film), letting it dry completely, and then painting. We were pleased with how our paint looked when we finished, so we didn’t even use a gloss at the end. I think it’s a nice, satin look, and it will be easy to dust—we’re quite happy with it!
To avoid streaking, the secret is to use a high quality brush; they’re worth the investment. You get what you pay for with your brushes, or else they shed and you’re picking the bristles out of your paint. Overall, my advice is to start by painting a small piece, have a success, then move on to something bigger.”
 REBEKAH PERRY CLARK, OWNER OF CLARK TEAM DESIGN/DECORATING DEN INTERIORS
RPERRYCLARK.DECORATINGDEN.COM, @CLARK_TEAM_DESIGNS
“Sometimes adding a bit of inspiration to something as simple as your dinner table is all it takes to transform a room—and filling the space can be affordable, easy and fun.”
Step 1: First, decide on the color scheme: Something that compliments other elements in the room, such as the window treatments, wall color, artwork or simply an area rug. Then, find a simple table runner to bring out those colors. In this case, a deep cobalt blue runner with an embroidered decorative accent was chosen.
Step 2: Next, find a glass container that works with the scale of your table. You can do different sizes if you  wish, just make sure you do an odd number of containers, as this is normally more visually pleasing. Once you have the containers, you can easily fill them with sand, pebbles or marbles from the garden section of a local home improvement store, or even rocks from around your garden.
Step 3: Finally, top off the look with candles, easily placed inside. Unscented are best for a dinner table, and you can use real candles or flameless. Pick colors that will stand out in the glass, or neutral to give a more natural, clean look.
 KARA KAVENSKY, MARKETING DIRECTOR OF ADAM GIBSON DESIGN
Adamgibsondesign.com, @adamgibsondesign
“At Adam Gibson Design, incorporating lighting thoughtfully into the home is an important element of our work. As more people are working from home right now, they can make some simple changes to their workspace that can not only help them look fabulous on their Zoom calls, it can also aid in productivity and balance their circadian rhythms, helping them sleep better at night.
Being a Certified Living-in-Place Professional, Adam has taught me the importance of considering wellness in every aspect of the home, and that includes the workspace. If you want to create your own workspace at home, even if it’s only temporary, considering the lighting around you is important. If you want to go all-out, you can order light bulbs that are connected to an app you can program through the day so that the bulbs change color temperature as the day progresses, beginning with a warm, golden light during sunrise, and gradually becoming colder (bluer) as the day progresses, matching the natural rhythm of the sun. At night, the lights become golden, triggering our brains’ melatonin, letting the body know sleep is coming.
There are also simple changes you can make that don’t cost anything: You can create a stand desk on a  kitchen counter, or you can even just stack some coffee table books up to make a platform for your phone, or use a very sturdy box for your laptop. The key is to position it in a place where you can find as much natural light as you can—for example, near a sunny window.
To help make yourself look as good as possible on your Zoom calls, if you prefer to have your back turned to the light, you can creatively position a plain sheet behind you as a backdrop, and then set a table lamp in front of you that faces you—but on the other side of your laptop so it doesn’t cast a shadow, a bit to the side. Then you can also put a sheet of aluminum foil or a piece of white paper on the table between you and the computer to reflect light up to help illuminate your face. Just make sure any recessed lights above your head are turned off, because the light from above can shadow your eye sockets and make you look a little ghoulish. These tips will help make your face appear softer, and your ‘RBF’ look completely fabulous!”
 KATHY HOSKINS, OWNER AND LEAD DESIGNER OF HOSKINS INTERIOR DESIGN
Hoskinsinteriordesign.com, @hoskinsinteriordesign
“Spring in Indiana is the perfect time of year to look for inspiration in your own  yard, and it’s free! Take a look around, get creative, and most importantly have fun. You truly have nothing to lose and beauty to gain.
I like to take a simple glass bowl or vase and fill it with some pretty blooming branches from a tree, a few happy little daffodils, or even sprigs from a bush—it can be just what you need to bring a little life and color into your space.”
Indiana Design Center is an Indy Maven partner.
Stephanie Groves is an Indy-based freelance writer and former magazine home editor who loves starting new design projects but never manages to finish most of them.